1. Joining a Windows Domain Network
This section describes how to add your computer
to a domain network run by a version of Windows Server. If you’re lucky,
your network administrator will take care of this for you.
Alternatively, she or he might give you custom-tailored instructions for
your network. By all means, use those instructions instead of the
generic plan in this section.
Note
Most Windows 7
installations will work “out of the box” without the need to install any
additional network components. If your network uses Novell servers,
though, your network manager may give you instructions for adding
additional client software. |
At the very least, your network administrator will give you four pieces of information:
The name to be given to your computer.
The domain name for your network.
Your network logon name and password.
Any
specific configuration information for the Internet Protocol (TCP/IP).
In most cases, it is not necessary to make any changes in the default
settings.
If your computer was connected to the network
when you installed Windows 7 and you entered this information then.
Use the following procedure to make your computer a member of your network domain:
1. | Log on to Windows with a Computer Administrator account.
|
2. | Click
Start, right-click Computer, and select Properties. Click Change
Settings in the Computer Name, Domain, and Workgroup settings section.
|
3. | Click the Network ID button.
|
4. | Select This Computer Is Part of a Business Network; I Use It to Connect to Other Computers at Work, and then click Next.
|
5. | Select My Company Uses a Network with a Domain, and then click Next twice.
|
6. | Enter
your network login name, password, and the network domain name, as
supplied by your network administrator. Then click Next.
|
7. | You
might be asked to enter your computer’s name and its domain name. This
information will also have been supplied by your network administrator.
If you’re asked, enter the computer and domain names provided, and then
click Next.
You also might be prompted for a domain Administrator account name
and password. If this occurs, the network administrator will have to
assist you.
|
8. | You should finally get the message “Welcome to the xxx domain.” Close the Properties dialog box and allow Windows to restart.
If an error message appears instead, click Details to view the
detailed explanation of the problem. Report this information to your
network administrator for resolution. The problem could be in your
computer or in the network itself.
|
Note
If your computer is
disconnected from the network or you want to install new hardware, you
can log on using a local account. Select the computer’s name instead of
your network domain name, and log on using a local Computer
Administrator account. |
When your computer has been joined to the domain
and restarted, the Windows 7 Welcome screen no longer appears and you
need to use the old-style logon system to sign on. To log on, press
Ctrl+Alt+Del and then enter your account name, password, and domain
name. You can specify an alternative domain name by entering your
username and account together this way: myaccount@domain.
2. Checking Out the Neighborhood
Your network is finally ready to go. After you
have configured, connected, and perhaps restarted each of your
computers, open Windows Explorer: Click Start, Computer or,
alternatively, Start, Documents. (Any Windows Explorer view will work.)
Look for the Network item at the left edge of the Window, as shown in Figure 1.
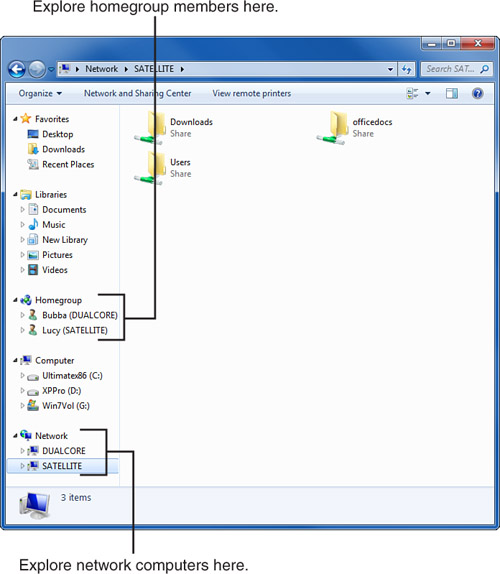
If your network is up and running, and Network
Discovery is enabled, you should see one icon for every computer you’ve
connected. Double-click any icon to see what that computer is sharing
with the network.
If you set up a homegroup, the Homegroup list
will have an entry for each user who has elected to share files. There
may be entries for the other users on your own computer, as well as
users on other computers. Shared printers should
already be listed in your Devices and Printers Control Panel applet,
automatically, although if you have one or more printers that are not
connected via USB cables, you may have to take additional steps to share
them.
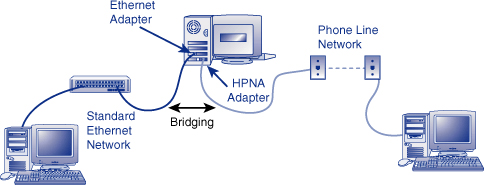
3. Bridging Two Network Types
Windows 7 provides the capability to connect or
bridge two different network types through software. This can eliminate
the need to buy a hardware device to connect two disparate networks. Figure 2
shows an example of what bridging can do. In the figure, one Windows 7
computer serves as a bridge between an Ethernet LAN and a phoneline LAN.
Bridging is similar to routing, but it’s more
appropriate for small LANs because it’s easier to configure and doesn’t
require different sets of IP addresses on each network segment.
Technically, bridging occurs at the physical level of the network
protocol stack. Windows forwards network traffic, including broadcasts
and packets of all protocol types received on either adapter to the
other. In effect, it creates one larger network.
To enable bridging in your Windows 7 computer, install and configure two or more network adapters. However, don’t worry about setting up the
Internet Protocol (TCP/IP) parameters for either of the adapters yet.
Then do the following:
1. | View
the connection icons by clicking Start, Control Panel, View Network
Status and Tasks (under Network and Internet), Change Adapter Settings.
|
2. | Select the icons you want to bridge by clicking on the first, holding down the Ctrl key, and clicking on the second.
|
3. | Right-click one of the icons and select Bridge Connections.
|
4. | A
new icon named Network Bridge appears. Select this new icon and, if you
want, rename it appropriately—for example, “Ethernet to Phoneline.”
|
5. | Double-click
the new Network Bridge icon. Select Internet Protocol (TCP/IP) and
configure your computer’s TCP/IP settings. You must do this because any
TCP/IP settings for the original two adapters are lost.
|
When you’ve created a bridge, your two network
adapters function as one and share one IP address, so Microsoft disables
the “network properties” of the individual network adapters. You must
configure your computer’s network properties with the Network Bridge
icon.
Remember that the connection between the two networks depends on the computer with the bridge being powered on.
You can remove the bridge later by right-clicking the Network Bridge icon and clicking Delete.